Through various updates, Windows is trying to give you some special features of Windows and is trying tosolve a problem with the help of updates.
If you are using Windows 10 operating system and are bothered by updates from Windows and a lot of data consumption then this article will be very useful for you.
There are different methods to turn off these windows automatic updates, we will tell you the methods which we have tried it ourselves.
Let\’s start to learn to stop or turn off Windows 10 automatic updates using the following methods.
Method 1 (turn off Temporarily):
If you want to turn off windows updatesfor some time or want to pause automatic updates for a specific period then follows this method.
Click on ‘Start’ menu > Settings
Find and click on the ‘Update & Security’option.
From the left menus, select the‘Windows Update’ option.
You will see there are some options like Check for updates, Pause updates for 7 days, Change active hours, View update History, Advanced options,etc
(see fig. 3).Exact below check ‘updates’, you will see‘Pause updates for 7 days.’
If you want to pause windows updates for 7 days then simply click on that option. You can temporarily disable automatic updates for 7 days by this processor.
Do you want to resume windows updates for more than 7 days? No problem, we have another option to do it. Just follow the following steps.
Look at fig. 2 there is an option called‘Advanced options’ just below the view update history.
 |
| fig. 2 |
So these above processors are not for turning off Windows 10 updates permanent!
How to turn off windows 10 automatic updates permanently?
Friends, remember that Microsoft provides you with important updates not to bother you but to secure your systemby updating security patches.
So let’s start to turn off windows updates permanently, just follow the following steps.
Method 2 (turn off permanently):
In this method, we are using ‘Local Group Policy’. be aware that we are going to edit the windows group policy.
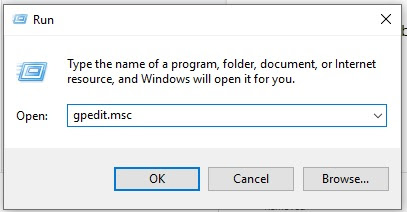
To edit group policy, search ‘Run’ and enter ‘gpedit.msc’ command line and then click ok. A group policy edit window will be open. (see fig. 3)
 |
| fig.3 |
Very important Note:sometimes you can’t access Group Policy. When you run gpedit.msc command then you may see a message ‘Windows can not find ‘gpedit.msc’, Make sure you’ve typed the name correctly, then try again.’
it means you must enable access to group policy. To enable group policy editor, run ‘gpedit.bat’ file.
Click here to download the ‘gpedit.bat’ file. Save it on your desktop. Right-click on gpedti.bat file and run it as administrator. Wait to complete command execution, it may take 2 to 5 minutes. Don’t close the command window until complete all command execution.

Ignore the above important note if you have successfully opened the Group policy editor. (see fig.4)
 |
| fig. 4 |
Look at the right panel, there are two sections: Computer Configuration and User Configuration.
Expand \’
Administrative Templates\’ from the Computer Configuration section.Then find and click on Windows Components. (see fig. 4)
Look at the Right panel, at the bottom, find out and click on Windows update.
You will see a lot of settings appear in front of you. Now find and click onConfigure Automatic Updates.
A new window will be open. (see fig.5 ).
 |
| fig. 5 |
There are three important settings.
👉Not Configured:- it means don’t change any update settings, just leave as default.
👉Enable:- it means you can manage the update settings manual.
👉Disable:- it means disable Automatic updates permanently.
If you want to turn off windows 10 automatic update permanently, then select the Disable option.
Final Setting:
That’s it! You have successfully disabled windows automatic updates.
Doing this processor, please don’t make any other changes in the Local Group Policy editor. Any other wrong changes can make it harmful to your system.
We hope you have liked this article,please share this article with your friends who are bothered by Windows Automatics updates.
Thanks!
Get our daily post Subscribe to TECH SUCCESS EDGE by Email
